There are several applications and guides on how to create a UBS installer disk for macOS but I personally always use ‘createinstallmedia’ command in Terminal which is recommended by Apple.
You will need a USB disk drive with 16 GB of storage capacity for modern macOS versions such as Monterey, Big Sur, Catalina and Mojave and an 8GB disk drive for older versions of macOS.
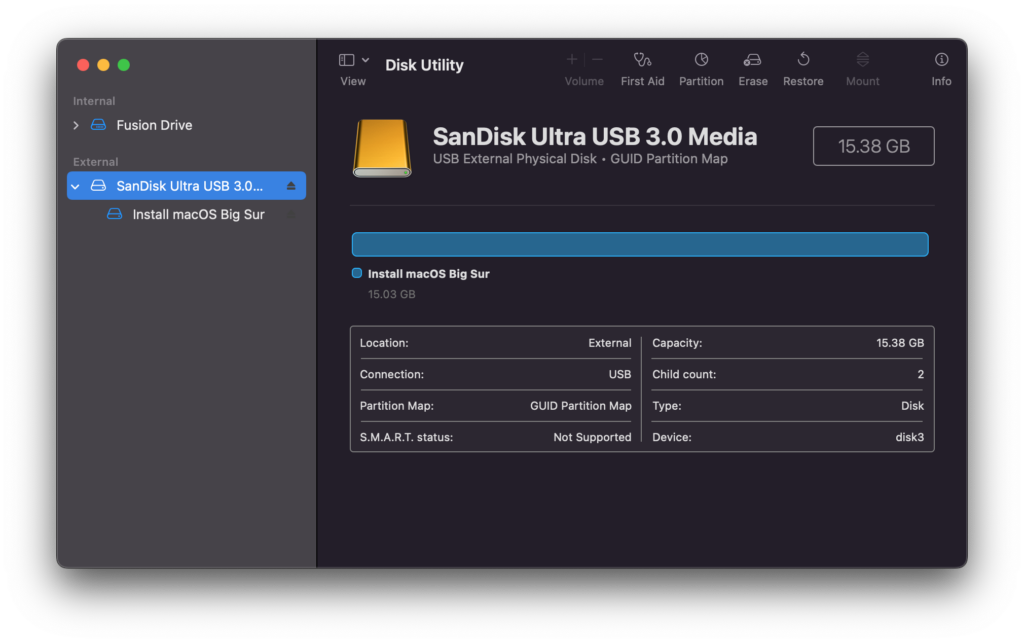
1. From the Applications folder navigate to Utilities and open Disk Utility.
2. Press the Command+2 to show All Devices because by default Disk Utility shows only the volumes not the disks themselves.
3. Now Select the USB Disk you want to use for the installer and from the tool bar select Erase button. This will erase all your data so make sure you don’t have anything important on your disk.
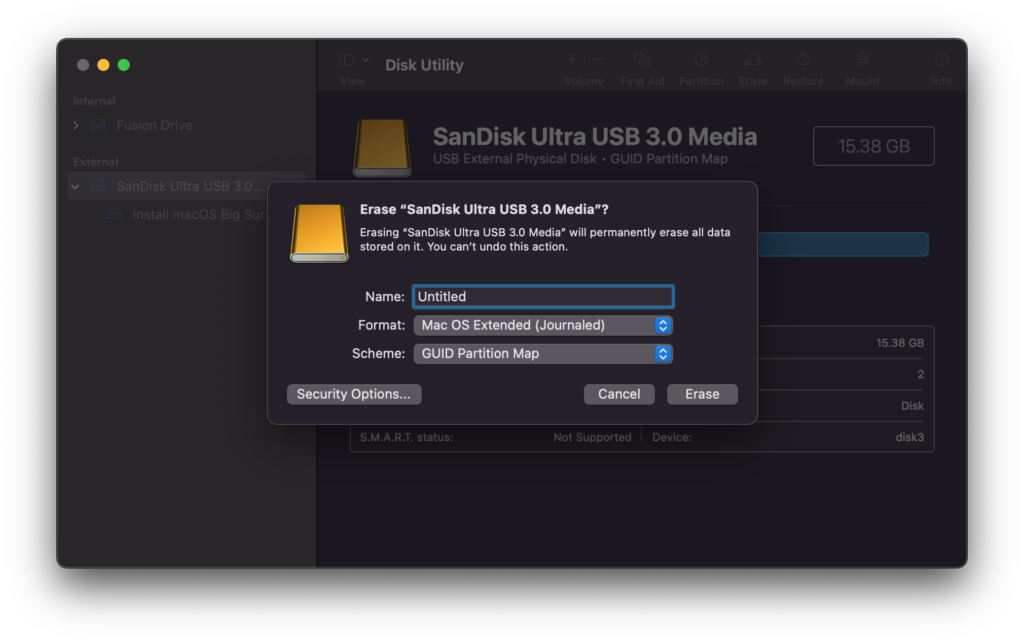
4. The USB disk must be formatted as Mac OS Extended (Journaled) with GUID Partition Map Scheme and for the sake of simplifying the procedure just leave the name as Untitled.
5. Now that the USB disk is ready open Terminal application from /Applications/Utilities and use the following commands for creating the installer:
Sequoia:
sudo /Applications/Install\ macOS\ Sequoia.app/Contents/Resources/createinstallmedia --volume /Volumes/Untitled --nointeraction
Sonoma:
sudo /Applications/Install\ macOS\ Sonoma.app/Contents/Resources/createinstallmedia --volume /Volumes/Untitled --nointeraction
Ventura:
sudo /Applications/Install\ macOS\ Ventura.app/Contents/Resources/createinstallmedia --volume /Volumes/Untitled
Monterey:
sudo /Applications/Install\ macOS\ Monterey.app/Contents/Resources/createinstallmedia --volume /Volumes/Untitled
Big Sur:
sudo /Applications/Install\ macOS\ Big\ Sur.app/Contents/Resources/createinstallmedia --volume /Volumes/Untitled
Catalina:
sudo /Applications/Install\ macOS\ Catalina.app/Contents/Resources/createinstallmedia --volume /Volumes/Untitled
Mojave:
sudo /Applications/Install\ macOS\ Mojave.app/Contents/Resources/createinstallmedia --volume /Volumes/Untitled
High Sierra:
sudo /Applications/Install\ macOS\ High\ Sierra.app/Contents/Resources/createinstallmedia --volume /Volumes/UntitledSierra:
sudo /Applications/Install\ macOS\ Sierra.app/Contents/Resources/createinstallmedia --volume /Volumes/Untitled --applicationpath /Applications/Install\ macOS\ Sierra.app* If your Mac is using macOS Sierra or earlier, include the --applicationpath argument and installer path, similar to the way this is done in the command for El Capitan.El Capitan:
sudo /Applications/Install\ OS\ X\ El\ Capitan.app/Contents/Resources/createinstallmedia --volume /Volumes/Untitled --applicationpath /Applications/Install\ OS\ X\ El\ Capitan.app
Yosemite:
sudo /Applications/Install\ OS\ X\ El\ Capitan.app/Contents/Resources/createinstallmedia --volume /Volumes/Untitled --applicationpath /Applications/Install\ OS\ X\ El\ Capitan.appMavericks:
sudo /Applications/Install\ OS\ X\ Mavericks.app/Contents/Resources/createinstallmedia --volume /Volumes/Untitled --applicationpath /Applications/Install\ OS\ X\ Mavericks.app 6. You can copy/paste the above commands and by pressing enter you will be asked to enter your password, type in your system’s password (it won’t be shown in the terminal that you are typing anything) and then press enter for the command to start.
After several minutes your USB Installer disk will be ready. It might take up to 30 minutes depending on the speed of your USB disk.
You can fine more information about ‘createinstallmedia’ command in Terminal at: